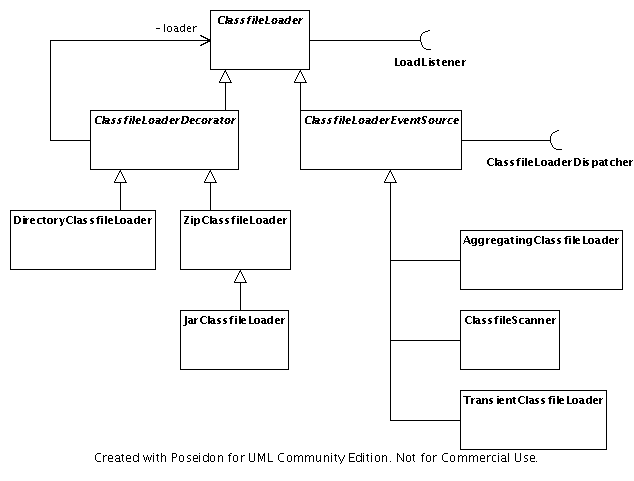
ClassfileLoader Hierarchy
For Dependency Finder version 1.4.1.
by Jean Tessier
DependencyExtractorextract.jspVisitorDependency Finder uses a number of third-party packages, especially for testing. Everything you need to run Dependency Finder is in the distribution files, but you will need additional software if you want to compile your own custom version and/or run the test suite. The tables below list those third-party packages, where you can find them, and which version we have tried Dependency Finder with. Older or newer version have a good change of working too, but these are tried and true.
For simple compilation:
| Name | Location | Tested Version |
|---|---|---|
| Tomcat | tomcat.apache.org | 5.5.17 |
For testing:
| Name | Location | Tested Version | |
|---|---|---|---|
| JUnit | junit.org | 4.5 | |
| jMock | jmock.org | 2.5.1 | |
| FitLibrary | fitlibrary.sourceforge.net | 2006-01-16 | |
| HttpUnit | httpunit.sourceforge.net | 1.7 | |
| Emma | emma.sourceforge.net | 2.0.5312 | |
| Clover | cenqua.com/clover | 1.3.13 | You will need the clover-ant distribution. |
JAVA_HOMEDEPENDENCYFINDER_HOMEDEPENDENCYFINDER_OPTSDEPENDENCYFINDER_CONSOLEweb.xml
I spend a lot of my personal time on Dependency Finder and I have grown very
attached to it. I work very hard to keep the code quality as high as I can,
and in order to do that, I must retain strict control over what goes into
Dependency Finder. I take great pride in the work I do on Dependency Finder
and that is part of why all the package names start with "com.jeantessier".
If you have built some great addition or enhancement to Dependency Finder, there are two ways you can share it with the world and help Dependency Finder (and yourself too).
The best way to share your addition/enhancement with the world is for you to create your own open source project. SourceForge can help you with this and there are other alternatives. With your own project, you can take all the credit for your work and manage it the way you want to. You are free to redistribute Dependency Finder with your code. You don't have to make your project open source if you don't want to, you can charge for it or release it to the public domain. The Dependency Finder license is very lax, you can do pretty much what you want with it as long as my name remains on the Dependency Finder code.
By pointing to the Dependency Finder project from your project, you help it show up on web search engines like Yahoo! and Google. This raises awareness of Dependency Finder and helps it gain popularity. I will, of course, return the favor and mention you project on the Dependency Finder website. This way, we both help each other.
Another, less desirable, option is for you to surrender your code to me for
inclusion in Dependency Finder. I will review your code thoroughly and I may
modify it extensively to make it meets my standards of quality (I'm not
necessarily claiming that my standards are better, but they are mine) and
that it fits well with the rest of Dependency Finder. In the end, your code
will end up in a com.jeantessier package and will bear the standard license
header. Your name and the nature of your contribution will be listed on the
Dependency Finder website and in some of the documentation, but most likely
nowhere in the code itself.
At this time, I do not accept any monetary contributions or any other form of compensation. The only thing I get out of Dependency Finder is the joy to know people are using my stuff and actually finding it useful. I don't even accept donations as some people might construe it entitles them to something. If you want to help the project, simply tell a friend, or two, or three ...
You use the com.jeantessier.classreader package to parse compiled
Java code. You feed .class files to a ClassfileLoader and you get
instances of Classfile back.
ClassfileLoader
ClassfileLoader Hierarchy
Here is the basic interface for ClassfileLoader:
    public class ClassfileLoader {
        public void load(Collection filenames) {
        public Collection getAllClassfiles();
    }
At the most simple, you can just call load(filenames) and then iterate over
the Classfiles from getAllClassfiles().
    Collection sources = /* Get filenames to read ... */
    ClassfileLoader loader = new AggregatingClassfileLoader();
    loader.load(sources);
    for(Classfile classfile: loader.getAllClassfiles()) {
        /* Do something with classfile ... */
    }
This approach has a few drawbacks.
First, it requires you to read all the .class files into memory before you
can start processing them. Often, processing one class does not require any of
the others, so this is potentially using up a lot of memory needlessly.
Second, there is no way for you to monitor classes as they are being loaded.
This comes in handy for showing progress indicators.
For those reasons, you should use an event-driven approach instead. You can
implement the LoadListener interface and register with the ClassfileLoader
by calling addLoadListener(listener) (not shown above). Your implementation
will receive various callbacks as the .class files are read in to let it know
how things are progressing.
    class MyLoadListener implements LoadListener {
        public void endClassfile(LoadEvent event) {
            Classfile classfile = event.getClassfile();
            /* Do something with classfile ... */
        }
        /* ... */
    }
    Collection sources = /* Get filenames to read ... */
    LoadListener listener = MyLoadListener();
    ClassfileLoader loader = new TransientClassfileLoader();
    loader.addLoadListener(listener);
    loader.load(sources);
The ClassfileLoader classes you will use the most often derive from
ClassfileLoaderEventSource. These loaders are the ones who actually create
instances of Classfile. They also keep track of LoadListener objects and
drive the event model associated with parsing class files.
There are two concrete subclasses of ClassfileLoaderEventSource:
AggregatingClassfileLoader keeps a reference to every Classfile it loads.
You can access them through getAllClassfiles(). TransientClassfileLoader,
on the other hand, does not hold on to any of them. It simply drives the event
loop. It's implementation of getAllClassfiles() returns an empty collection.
ClassfileLoader has only one public method for loading classes that takes a
collection of names. This defines a session. The listeners will receive a
beginSession event at the beginning of the method and an endSession event
just before the method returns. Each name in the collection defines a group.
This can be a JAR file, a Zip file, a directory hierarchy containing .class
files, or even a single .class file. The processing of each group starts
with a beginGroup event and ends with an endGroup event. The loader treats
a group as a collection of files. Each file is processed in turn, begining
with a beginFile event and ending with an endFile event. The loader uses
a ClassfileLoaderDispatcher instance to determine how to process a file. If
the file is a .class file (as per the dispatcher), the loader finally starts
processing it, surrounded by a beginClassfile event and an endClassfile
event. The EndClassfile event will have a reference to the newly loaded
Classfile instance.
Node that the various begin??? events are not guaranteed to be matched by
corresponding end??? events. Various errors can lead to the loss of events.
In summary, you can get instances of Classfile either from endClassfile
events or by querying the loader. Once you have them, you can traverse them
with objects that implement com.jeantessier.classreader.Visitor. They have
callback methods that get called by the various parts of Classfile objects.
EventSourceClassfileLoader uses other ClassfileLoader implementation to
process the various kinds of files it encounters. Depending on the nature of a
file, as determined by its dispatcher, the loader uses one of three decorator
loaders to actually open input streams to individual class files. These
decorators are subclasses of ClassfileLoaderDecorator. They are:
A decorator opens input streams from the data sources and passes them to an
underlying ClassfileLoader. The reason for the distinction is to separate
concerns of how long the Classfile instances remain in memory from concerns
about how to open various input file types.
Visitor
We use Classfile instances to represent the data in .class files. We just
saw how to get Classfile instances using a ClassfileLoader and the
event-driven mechanism. Now, Classfile is actually the root of a large set
of objects that represent all the details of a compiled Java class. Traversing
this complex object graph can be non-trivial and is very repetitive. This is
why Dependency Finder uses the Visitor pattern as a means of traversing
Classfile data.
You can implement the com.jeantessier.classreader.Visitor interface to
traverse Classfile structures. It has callback methods that get called on
various parts of the structure.
One easy solution is to have a class that implements both LoadListener and
Visitor with the following endClassfile() method:
    class MyListenerAndVisitor implements LoadListener, Visitor {
        public void endClassfile(LoadEvent event) {
            event.getClassfile().accept(this);
        }
        /* ... */
    }
You might end up having quite a few visitors, all duplicating this piece of
code. So we already provide it as part of the Dependency Finder library. The
class LoadListenerVisitorAdapter takes a Visitor and hands it over to
Classfile instances are they are made available by the ClassfileLoader.
With it, your class only needs to implement the Visitor interface and can
focus on the processing at hand, instead needing a series of empty methods to
satisfy the LoadListener contract.
    class MyVisitor implements Visitor {
        /* ... */
    }
    Collection sources = /* Get filenames to read ... */
    MyVisitor visitor = MyVisitor();
    ClassfileLoader loader = new TransientClassfileLoader();
    loader.addLoadListener(new LoadListenerVisitorAdapter(visitor));
    loader.load(sources);

LoadListener to Visitor Adapter
Look at the code of ClassMetrics for an example of using the Visitor
pattern to traverse Classfile instances.
You create a dependency graph with a NodeFactory. The factory keeps track
of the package nodes at the top of the graph and all their subordinate nodes.
Individual nodes keep track of their outbound and inbound dependencies.
You extract dependencies from Classfile instances with a
CodeDependencyCollector. You can either give it your own NodeFactory or
you can let it create an empty one for you. CodeDependencyCollector is a
Visitor, so you can register it with a ClassfileLoader using a
LoadListenerVisitorAdapter so it will visit each Classfile as it is loaded.
    Collection sources = /* Get filenames to read ... */
    NodeFactory factory = new NodeFactory();
    Visitor visitor = new CodeDependencyCollector(factory);
    ClassfileLoader loader = new TransientClassfileLoader();
    loader.addLoadListener(new LoadListenerVisitorAdapter(visitor));
    loader.load(sources);
/* Further processing using factory ... */

CodeDependencyCollector
CodeDependencyCollector fires its own set of events during processing. If
you are interested in those events, simply implement DependencyListener and
register yourself with the collector through its addDependencyListener()
method. Processing a Classfile begins with a beginClass
event and ends with an endClass event. As the processing unfolds, it will
fire a dependency event for each dependency in encounters. Please note that
while the dependency graph shows only a single dependency for
A --> B, the collector can potentially fire multiple
dependency events for it if it occurs more than once in the code. It is also
impossible to determine the order of calls from the dependency graph, but the
events arrive in the order the dependencies are discovered.
For example, if you take the following method:
    public void f() throws Exception {
        try {
            out.write("abcd");
        } catch (java.io.IOException ex) {
            out.close();
        }
    }
Processing it will fire the following events in this order:
f() --> outf() --> java.io.Writerf() --> java.io.Writer.write(java.lang.String): voidf() --> java.lang.Stringf() --> outf() --> java.io.Writerf() --> java.io.Writer.close(): voidf() --> java.io.IOExceptionf() --> java.lang.Exception
No. 4 comes from analyzing the signature of write(), not from the constant
"abcd". No. 8 comes from looking at exception handlers.
Because Node uses Set to store dependencies on other Nodes, duplicate
dependencies are removed. No. 1 and No. 5 above are duplicates. No. 2 and
No. 6 are duplicates too. In the end, the graph would look as follows:
    f()
        --> java.io.IOException
        --> java.io.Writer
        --> java.io.Writer.close(): void
        --> java.io.Writer.write(java.lang.String): void
        --> java.lang.Exception
        --> java.lang.String
        --> out
DependencyExtractor
Let's take a look at DependencyExtractor and see how it uses what we've seen
so far to generate a dependency graph. Here is the core part of the main()
method from com.jeantessier.dependencyfinder.cli.DependencyExtractor. The
Ant equivalent is very similar.
    01:    List parameters = commandLine.getParameters();
    02:    if (parameters.size() == 0) {
    03:        parameters.add(".");
    04:    }
    05:
    06:    VerboseListener verboseListener = new VerboseListener();
    07:
    08:    NodeFactory factory = new NodeFactory();
    09:    CodeDependencyCollector collector = new CodeDependencyCollector(factory);
    10:
    11:    ClassfileLoader loader = new TransientClassfileLoader();
    12:    loader.addLoadListener(new LoadListenerVisitorAdapter(collector));
    13:    loader.addLoadListener(verboseListener);
    14:    loader.load(parameters);
On lines 1 through 4, we set parameters to a list of file and directory
names, similar to what you would expect on CLASSPATH. The ClassfileLoader
will explore each one in turn, looking for .class files. Typically, I give
it a single directory where my compiled classes are, such as classes/, or a
single JAR file, such as myapp.jar. For large projects, I have sometimes
given it multiple JARs, though now ClassfileLoader is smart enough to search
for them automatically if I put all the JARs in one directory, such as lib/.
Line 6 sets verboseListener. It is only there to provide a progress
indicator for the user. It counts how many files are slated to be processed
and listens to "beginFile" events to tell the user how many percent-complete.
It also displays the name of files as they are being processed. There is a
VerboseListenerBase in the com.jeantessier.dependencyfinder package with
common functionality. Each subpackage (cli, ant, gui, the webapp)
extends it to create its own VerboseListener that is specific to that
package's user interface.
Lines 8 and 9 set up the collector that will build the graph and store it in factory. After all this, factory will contain the resulting graph.
Line 11 creates the loader and lines 12 and 13 attach our two listeners to
it, so they will receive LoadEvents. Notice how we use a
LoadListenerVisitorAdapter to tie the collector. Again, verboseListener
on line 13 is only there to help keep the user appraised of what is going on.
With the entire event pipeline in place, we finally put it all in motion on
line 14 by passing it the parameters. After control returns from load(),
the dependency graph is in factory.
What I typically do is pass factory.getPackages().values() to some visitor.
All visitors have a traverseNodes() method that takes a collection of
Nodes. So it usually looks like:
visitor.traverseNodes(factory.getPackages().values());
You might also want to look at GraphCopier and GraphSummarizer as example
visitors. They use two factories and a TraversalStrategy to make a partial
copy of a graph. You can take a look at query.jsp for an example of how this
is done. It uses the graph in the factory, select specific nodes and
dependencies from it according to the TraversalStrategy, and copy them to
their own internal NodeFactory instances. Then, the JSP runs a Printer on
the scope NodeFactory from the copier, not the original factory.
So far, we have looked at extracting a brand-new graph. For a large codebase, this can take a while. It would be nice if, after making a simple change, we could refresh the graph quickly by having it re-extract only those files that have changed and adjust the graph accordingly.
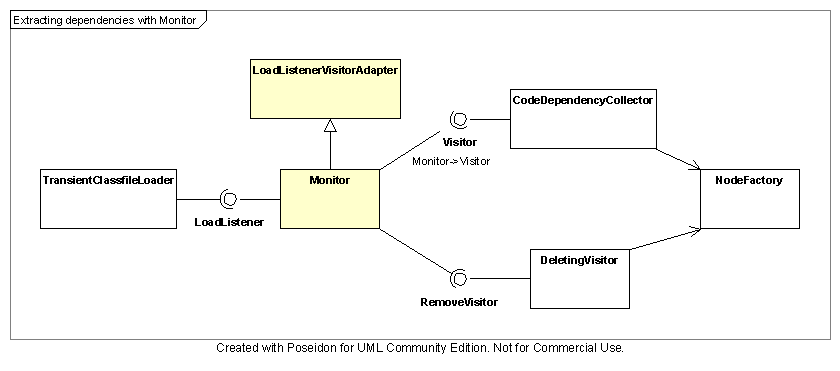
Monitor
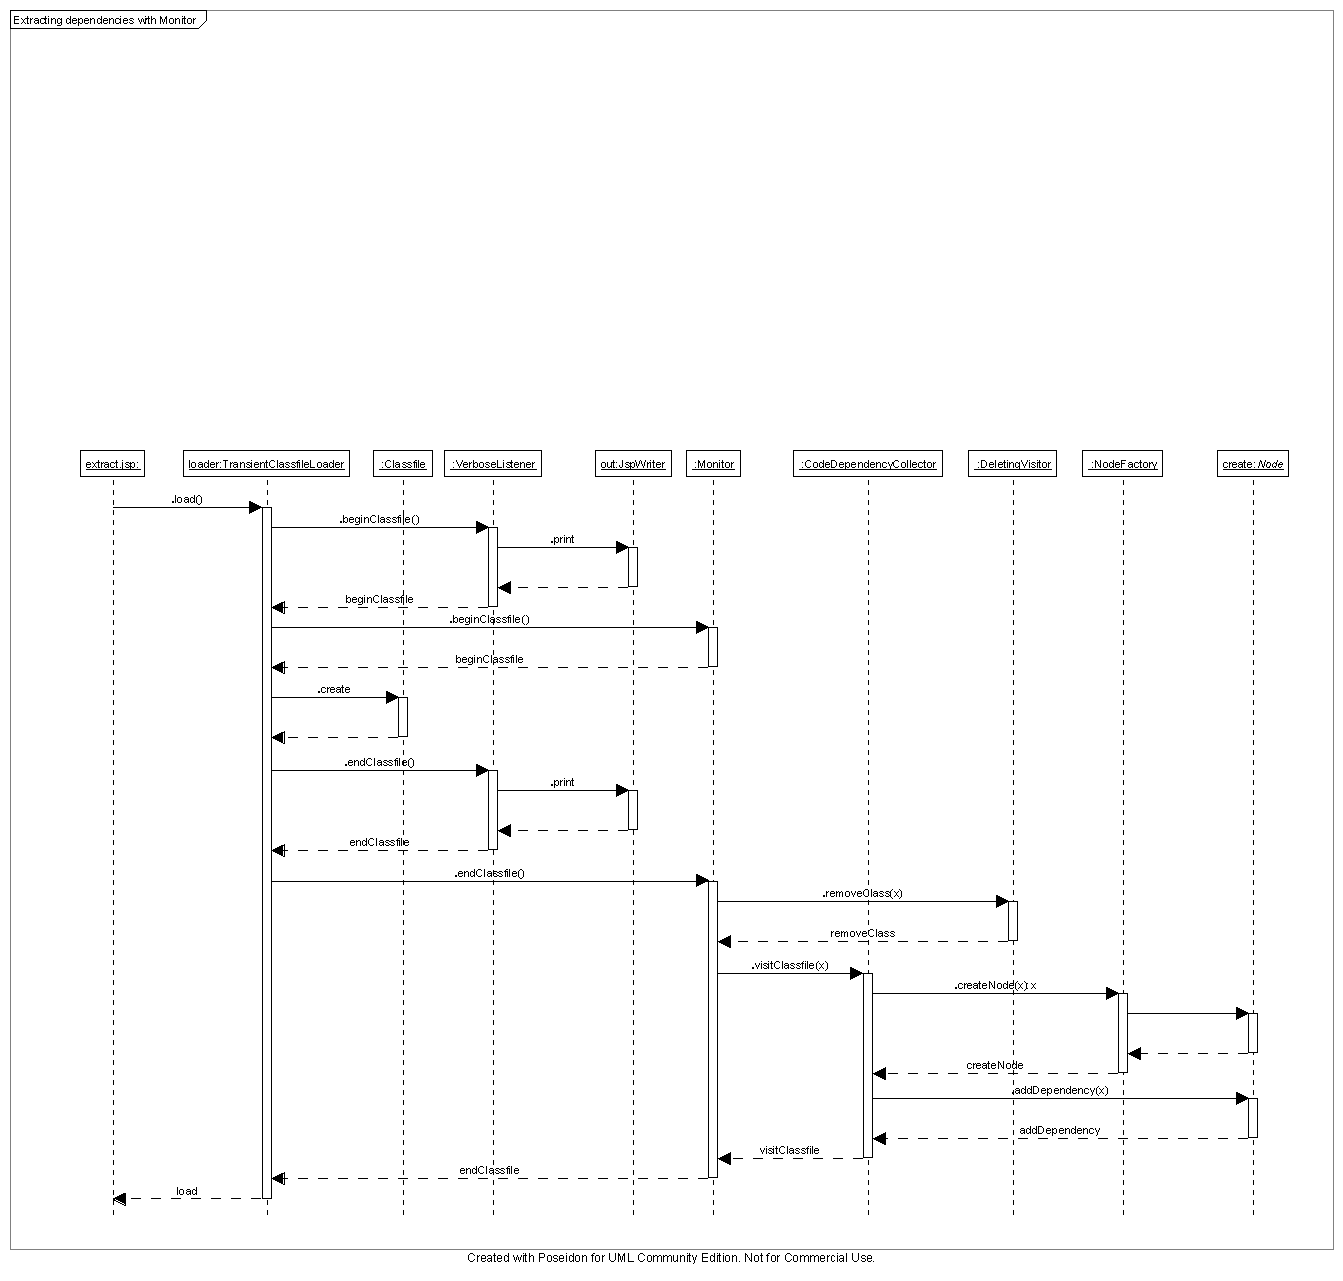
Monitor
extract.jsp
Let's take a look at extract.jsp and see how it generates a dependency graph
and how it differs from what we saw for DependencyExtractor. Here is the
core part of the JSP. The GUI equivalent is very similar, if spread across
multiple classes in the com.jeantessier.dependencyfinder.gui package.
    01:    Perl5Util perl = new Perl5Util();
    02:    Collection sources = new LinkedList();
    03:    perl.split(sources, "/,\\s*/", application.getInitParameter("source"));
    04:
    05:    VerboseListener verboseListener = new VerboseListener(out);
    06:
    07:    ClassfileLoaderDispatcher dispatcher = (ClassfileLoaderDispatcher) application.getAttribute("dispatcher");
    08:    if (dispatcher = null || request.getParameter("update") = null) {
    09:        dispatcher = new ModifiedOnlyDispatcher(ClassfileLoaderEventSource.DEFAULT_DISPATCHER);
    10:    }
    11:
    12:    NodeFactory factory = (NodeFactory) application.getAttribute("factory");
    13:    if (factory = null || request.getParameter("update") = null) {
    14:        factory = new NodeFactory();
    15:    }
    16:
    17:    Monitor monitor = (Monitor) application.getAttribute("monitor");
    18:    if (monitor = null || request.getParameter("update") = null) {
    19:        CodeDependencyCollector collector       = new CodeDependencyCollector(factory);
    20:        DeletingVisitor         deletingVisitor = new DeletingVisitor(factory);
    21:
    22:        monitor = new Monitor(collector, deletingVisitor);
    23:    }
    24:
    25:    ClassfileLoader loader = new TransientClassfileLoader(dispatcher);
    26:    loader.addLoadListener(verboseListener);
    27:    loader.addLoadListener(monitor);
    28:    loader.load(sources);
Lines 1 through 3 set up sources, the equivalent of parameters from
DependencyExtractor. We have already covered the purpose of
verboseListener, factory, and collector.
Lines 7 through 9 set up a special dispatcher for the loader. It has to do
with the webapp being a long-running process and extract.jsp being able to
only reload the classes that have changed since "the last time." Here, the
code uses a ModifiedOnlyDispatcher to remember what was done "the last time."
This dispatcher is stored in the session and passed to the ClassfileLoader.
That is, unless the user chooses to discard the current graph and start all
over, in which case the JSP creates a brand new dispatcher.
The JSP also saves factory in the session to make it available to the other JSPs that make up the web application. Lines 12 through 15 deal with retrieving back from the session or creating a new one, as appropriate.
Lines 17 through 23 create the monitor that will apply changes to the graph.
This is the second part of figuring out what "the last time" was. It, too,
keeps track of files as they are flying by on the event pipeline. When the
loader reloads a .class file, the monitor will first call removeClass()
on deletingVisitor to remove the previous dependencies regarding that class
from the graph. It then passes the event along to the collector to add the
new dependency information. Just like the dispatcher earlier, the monitor
is saved in the session and reused between invocations, unless the user decides
to start over, at which point the JSP simply create a brand new one instead of
reusing the one in the session.
Lines 25 through 28 serve the same purpose as before in DependencyExtractor.
Notice that Monitor extends LoadListenerVisitorAdapter and does not need
any special treatment before we register it with the loader.
If you are writing your own long-lived application that needs to pick up
changes to the .class files, you would set up the ClassfileLoader and
dispatcher and visitors once at initialization and hold on to the resulting
loader.
    01:    NodeFactory             factory         = new NodeFactory();
    02:    CodeDependencyCollector collector       = new CodeDependencyCollector(factory);
    03:    DeletingVisitor         deletingVisitor = new DeletingVisitor(factory);
    04:
    05:    ClassfileLoaderDispatcher dispatcher = new ModifiedOnlyDispatcher(ClassfileLoaderEventSource.DEFAULT_DISPATCHER);
    06:    Monitor                   monitor    = new Monitor(collector, deletingVisitor);
    07:    monitor.setClosedSession(true);
    08:
    09:    loader = new TransientClassfileLoader(dispatcher);
    10:    loader.addLoadListener(monitor);
Lines 1 through 6 set up the machinery for the loader. We have already covered the purpose of dispatcher, and monitor.
Line 7 instructs the monitor to use a closed session. This means that when
the loader sends a endSession event, the monitor will remove from the graph
any classes that were not looked at during the session that just ended. By
default, the monitor uses open sessions and does not remove any classes
(except as part of revising a modified class).
Lines 9 and 10 set up the loader instance for use by the application.
When you want to pickup changes in the classes, all you need to do is call
load() on the loader with the location of the .class files.
01: loader.load(sources);
Here, sources would point to the code that you want to analyze. The
application would have to execute this line everytime it wants to refresh the
graph, either because it detected a change in the .class files or in response
to a user action.
Visitor
You can implement the com.jeantessier.dependency.Visitor interface to
traverse a dependency graph. It has callback methods that get called by the
various instances of Node as the traversal progresses.
Look at the code for DependencyReporter and DependencyMetrics for examples
of using the Visitor pattern to traverse Node instances.
If you traverse a standard dependency graph, such as the ones produced by
CodeDependencyCollector, you will visit each dependency twice. If we take
the dependency A --> B as an example, a visitor will see it
once as an outbound node B while visiting node A, as shown in this call
stack:
    A.Accept(visitor)
        visitor.Visit[Package|Class|Feature](A)
            visitor.VisitOutbound(A.Outbound())
                B.AcceptOutbound(visitor)
                    visitorVisitOutbound[Package|Class|Feature]Node(B)
and a second time as an inbound node A while visiting node B, as shown in
this call stack:
    B.Accept(visitor)
        visitor.Visit[Package|Class|Feature](B)
            visitor.VisitInbound(B.Inbound())
                A.AcceptInbound(visitor)
                    visitor.VisitInbound[Package|Class|Feature]Node(A)
If you are only interested in outbound dependencies, you only have to
implement VisitOutbound[Package|Class|Feature]Node() and leave their inbound
equivalents empty. If you are only interested in inbound dependencies, you
only have to implement VisitInbound[Package|Class|Feature]Node() and leave
their outbound equivalents empty.
There is a VisitorBase class that embodies the Template pattern. It
implements all the methods from the Visitor interface, provides default
traversal of the dependency graph, and offers numerous extension points where
specific visitors can insert their own custom behavior. The following class
diagram shows all the methods that make up the extension points.
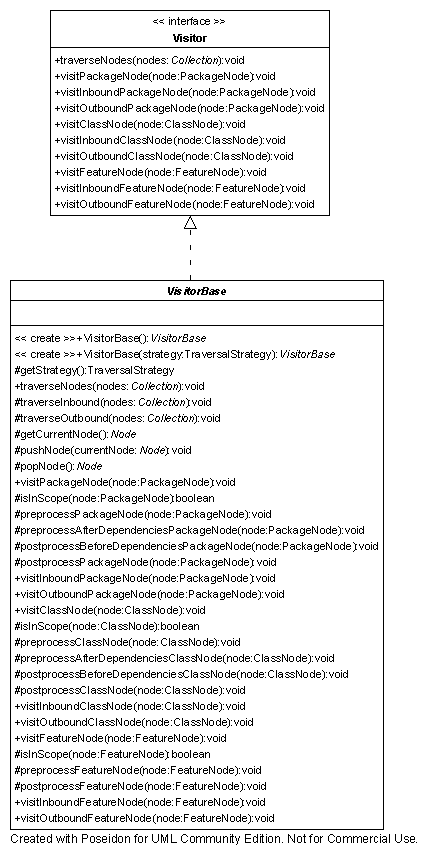
VisitorBase
Let's look into more details at visitPackageNode() to get a better
understanding of how the various templates operate.
    01:    public void visitPackageNode(PackageNode node) {
    02:        boolean inScope = isInScope(node);
    03:
    04:        if (inScope) {
    05:            preprocessPackageNode(node);
    06:
    07:            if (getStrategy().doPreOutboundTraversal()) {
    08:                traverseOutbound(node.getOutboundDependencies());
    09:            }
    10:
    11:            if (getStrategy().doPreInboundTraversal()) {
    12:                traverseInbound(node.getInboundDependencies());
    13:            }
    14:
    15:            preprocessAfterDependenciesPackageNode(node);
    16:        }
    17:
    18:        traverseNodes(node.getClasses());
    19:
    20:        if (inScope) {
    21:            postprocessBeforeDependenciesPackageNode(node);
    22:
    23:            if (getStrategy().doPostOutboundTraversal()) {
    24:                traverseOutbound(node.getOutboundDependencies());
    25:            }
    26:
    27:            if (getStrategy().doPostInboundTraversal()) {
    28:                traverseInbound(node.getInboundDependencies());
    29:            }
    30:
    31:            postprocessPackageNode(node);
    32:        }
    33:    }
Line 2 determines if we should bother visiting this package node at all. But
before that comes into play, notice that on line 18, we traverse the classes in
the package unconditionally. inScope will only affect whether or not we look
at the node itself and its dependencies; it has no bearings on classe in the
package or their features. The isInScope() method is an extension point for
this template method.
A subclass can do some processing before going down to visit classes. This is
shown in lines 4 through 16. preprocessPackageNode() on line 5, is called
before any dependencies or classes have been visited.
preprocessAfterDependenciesPackageNode(), on line 15, is called after the
dependencies but before the classes. They represent two more extension points
for this template method.
Similarly, a subclass can do some processing after going down to visit the
classes. This is shown in lines 20 through 32.
postprocessBeforeDependenciesPackageNode() on line 21, is called before any
dependencies but after the classes have been visited.
postprocessPackageNode(), on line 31, is called after the dependencies and
the classes. They represent two more extension points for this template
method.
The TraversalStrategy instance decides if inbound or outbound dependencies
get visited. The methods traverseNodes(), traverseOutbound(), and
traverseInbound() provide the traversal of the graph. They are the common
behavior of the template method.
The template methods visitClassNode() and visitFeatureNode() work very much
the same way, except that FeatureNodes have no descendants.
When overriding any of the extension methods, such as preprocessPackageNode()
and postprocessPackageNode(), it is very important to call their super
definitions.
    protected void preprocessPackageNode(PackageNode node) {
        super.preprocessPackageNode(node);
        /* Custom processing ... */
    }
/* ... */
    protected void postprocessPackageNode(PackageNode node) {
        /* Custom processing ... */
        super.postprocessPackageNode(node);
    }
This lets VisitorBase maintain a stack of Nodes that represents the current
path through the graph. All subclasses can call getCurrentNode() to get at
the current node in the traversal. This is particularly handy in the methods
that process inbound and outbound nodes to let them know which perspective to
use when looking at a dependency. For a dependency A --> B, are
we visiting A and looking at an outbound dependency to B? Or are we
visiting B and looking at an inbound dependency from A? Some visitors care
about this distinction, like TextPrinter for example.
Visitor and TraversalStrategy
Here is an example showing the sequence of calls between a visitor
implementation based on VisitorBase, its TraversalStrategy, and a sample
dependency graph. You can find the graph in
SampleGraph.xml.
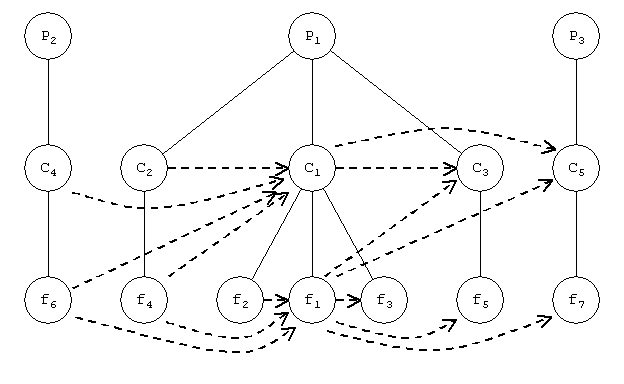
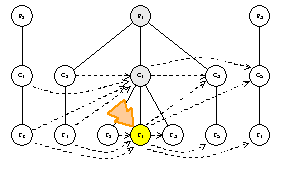
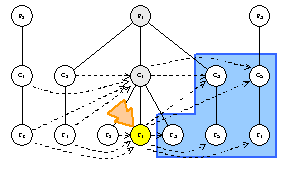
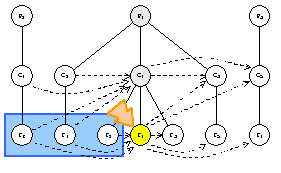
Here is the sample graph, magnified, so you can see what is going on. The
focus will be placed on package P1, class C1, and feature f1.
Even-numbered elements have dependencies on them, and they have dependencies on
odd-numbered elements. This example illustrates the traversal order and
processing that occurs on child nodes, outbound dependencies, and inbound
dependencies.
For the sake of this example, we use a plain SelectiveTraversalStrategy. It
will dictate the traversal of a node's outbound and inbound dependencies before
the traversal moves on to the subnodes. We will decorate it with a
SortedTraversalStrategy that will sort groups of nodes in alphabetical
order.
    visitor = new SomeVisitor(new SortedTraversalStrategy(new SelectiveTraversalStrategy()))
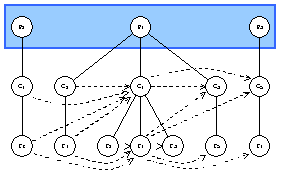
    visitor.TraverseNodes({P2, P1, P3})
    strategy.Order({P2, P1, P3})   ==>  {P1, P2, P3}
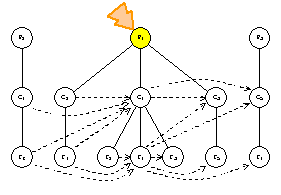
    P1.Accept(visitor)
    visitor.VisitPackageNode(P1)
    strategy.InScope(P1)
        visitor.PreprocessPackageNode(P1)
        strategy.PreOutboundTraversal()                        ==>  true
            visitor.TraverseOutbound(P1.Outbound())            // empty
        strategy.PreInboundTraversal()                         ==>  true
            visitor.TraverseInbound(P1.Inbound())              // empty
        visitor.PreprocessAfterDependenciesPackageNode(P1)
    visitor.TraverseNodes(P1.Classes())
    strategy.Order({C2, C1, C3})   ==>  {C1, C2, C3}
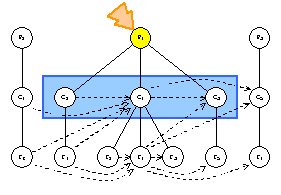
    C1.Accept(visitor)
    visitor.VisitClassNode(C1)
    strategy.InScope(C1)
        visitor.PreprocessClassNode(C1)
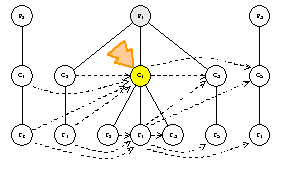
    strategy.PreOutboundTraversal()   ==>  true
        visitor.TraverseOutbound(C1.Outbound())
        strategy.Order({C3, C5})   ==>  {C3, C5}
        C3.AcceptOutbound(visitor)
        visitor.VisitOutboundClassNode(C3)
        C5.AcceptOutbound(visitor)
        visitor.VisitOutboundClassNode(C5)
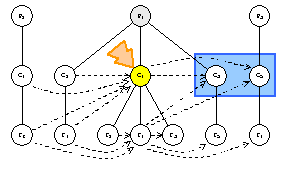
    strategy.PreInboundTraversal()   ==>  true
        visitor.TraverseInbound(C1.Inbound())
        strategy.Order({C4, C2, f6, f4})   ==>  {C2, C4, f4, f6}
        C2.AcceptInbound(visitor)
        visitor.VisitInboundClassNode(C2)
        C4.AcceptInbound(visitor)
        visitor.VisitInboundClassNode(C4)
        f4.AcceptInbound(visitor)
        visitor.VisitInboundFeatureNode(f4)
        f6.AcceptInbound(visitor)
        visitor.VisitInboundFeatureNode(f6)
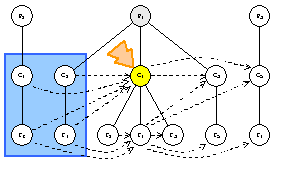
    visitor.PreprocessAfterDependenciesClassNode(C1)
    visitor.TraverseNodes(C1.Features())
    strategy.Order({f2, f1, f3})   ==>  {f1, f2, f3}
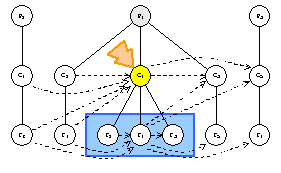
    f1.Accept(visitor)
    visitor.VisitFeatureNode(f1)
    strategy.InScope(f1)
        visitor.PreprocessFeatureNode(f1)
    strategy.PreOutboundTraversal()   ==>  true
        visitor.TraverseOutbound(f1.Outbound())
        strategy.Order({C3, C5, f3, f5, f7})   ==>  {C3, C5, f3, f5, f7}
        C3.AcceptOutbound(visitor)
        visitor.VisitOutboundClassNode(C3)
        C5.AcceptOutbound(visitor)
        visitor.VisitOutboundClassNode(C5)
        f3.AcceptOutbound(visitor)
        visitor.VisitOutboundFeatureNode(f3)
        f5.AcceptOutbound(visitor)
        visitor.VisitOutboundFeatureNode(f5)
        f7.AcceptOutbound(visitor)
        visitor.VisitOutboundFeatureNode(f7)
    strategy.PreInboundTraversal()   ==>  true
        visitor.TraverseInbound(f1.Inbound())
        strategy.Order({f6, f4, f2})   ==>  {f2, f4, f6}
        f2.AcceptInbound(visitor)
        visitor.VisitInboundFeatureNode(f2)
        f4.AcceptInbound(visitor)
        visitor.VisitInboundFeatureNode(f4)
        f6.AcceptInbound(visitor)
        visitor.VisitInboundFeatureNode(f6)
    strategy.PostOutboundTraversal()   ==>  false
    strategy.PostInboundTraversal()    ==>  false
    visitor.PostProcessFeatureNode(f1)

    f2.Accept(visitor)
        ...
    f3.Accept(visitor)
        ...
    visitor.PostProcessBeforeDependenciesClassNode(C1)
    strategy.PostOutboundTraversal()   ==>  false
    strategy.PostInboundTraversal()    ==>  false
    visitor.PostProcessClassNode(C1)

    C2.Accept(visitor)
        ...
    C3.Accept(visitor)
        ...
    visitor.PostProcessBeforeDependenciesPackageNode(P1)
    strategy.PostOutboundTraversal()   ==>  false
    strategy.PostInboundTraversal()    ==>  false
    visitor.PostProcessPackageNode(P1)

    P2.Accept(visitor)
        ...
    P3.Accept(visitor)
        ...
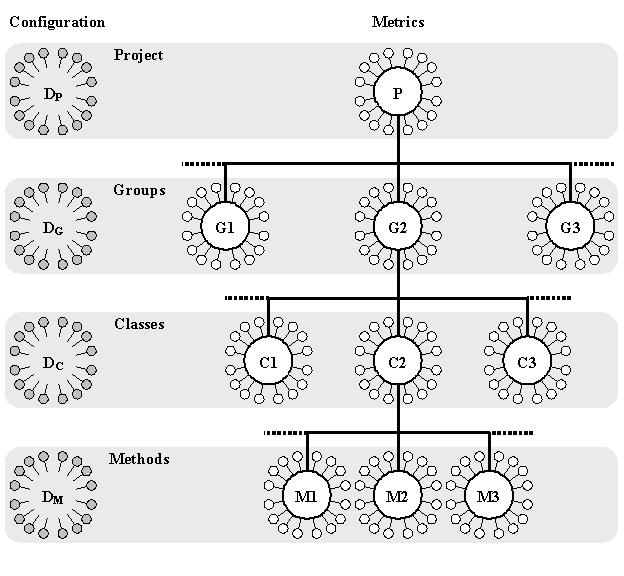
You use com.jeantessier.metrics.MetricsGatherer instance to read class
files and compute the metrics. It is a
com.jeantessier.classreader.Visitor and will traverse the complete
structure rooted at the Classfile instance and compute various metrics.
The MetricsGatherer uses a MetricsFactory to create the various Metrics
instances. The factory uses a MetricsConfiguration instance to decide what
measurements make up a given set of metrics. The configuration is loaded at
runtime from an XML file.
By default, the value of each measurement is computed only the first time it is requested and then cached for further request. You can refresh the caches through the API and you can turn off caching of individual measurements through their descriptor and in the configuration file.

You can use com.jeantessier.classreader.ClassfileLoader classes to
examine the baseline of your codebase; be they in JAR files, loose
class files, or a combination of both. You can apply the same treatment
to your latest codebase. You now have two sets Classfile instances.
You can use com.jeantessier.dependency.NodeFactory to create a tree
of packages, classes, and features from each codebase. You can then
start to compare them to each other. If a package is in the old
codebase but not in the new one, you can mark it as having been removed.
If it is not in the old codebase, but it is in new one, then you can
mark it as having been recently added. For packages that are present
in both codebase, you can repeat this analysis at the class level, and
then at the feature level.
The com.jeantessier.commandline package gives you the tools you need to parse
the command-line to your program, validate switches and parameters, and even
print a summary usage statement when your program is not called properly.
Switches start with a dash ("-") and usually have specific semantics
attached to them. Parameters are just strung out on the command-line and
usually don't have individual specific semantics, besides those they share as a
group.
You create a CommandLine instance to parse your command-line. At creation
time, you can supply a specific ParameterStrategy. Here are the ones that
ship with Dependency Finder.
AnyParameterStrategy- No restrictions, the command-line can include any number of parameters, including none at all. This is the default strategy if you do not specify one.
AtLeastParameterStrategy- The command-line must include at least a certain number of parameters or the framework will find the command-line invalid.
AtMostParameterStrategy- The command-line can include at most a certain number of parameters or the framework will find the command-line invalid.
ExactlyParameterStrategy- The command-line must include an exact number of parameters or the framework will find the command-line invalid.
NullParameterStrategy- The command-line cannot include any parameters or the framework will find the command-line invalid.
Once you have a parser, you can add switch definitions to it. There are five types of switches described below.
ToggleSwitch- The switch be followed by a value. It acts as a boolean,
falseif absent ortrueif present on the command-line.SingleValueSwitch- The switch must be followed by a value. It can only appear once on the command-line.
OptionalValueSwitch- The switch can appear by itself or followed by a value. It can only appear once on the command-line.
MultipleValuesSwitch- The switch must be followed by a value, but it can occur multiple times on the command-line. The values are accumulated in the same order as on the command-line and you retrieve them as a single
List.AliasSwitch- An alias switch passes its values to the switches it is an alias for. You can use an alias switch to group many switches together, so you can set them all at once with just one name.
You add switches with the matching addSwitch() methods on CommandLine. You
can supply switches with default values and specify if they are mandatory (must
appear on the command-line) or not.
When you create the parser, you can also specify if the parser will be strict
or not. Strict parsers will only accept switches that are explicitly specified.
Non-strict parsers treat an unknown switch as an OptionalValueSwitch.
Along with your CommandLine parser, you can create a CommandLineUsage that
will create a summary description of your command-line specification. You can
use this summary in error messages for invalid command-lines to help users
figure out what they did wrong.
To actually parse your command-line, just call CommandLine's parse() method
and pass it the string array that is main()'s sole parameter. The parser
will throw an exception if anything went wrong. After parsing, you can check
for the presence of specific switches with the IsPresent() method and get
the value(s) of specific switches with one of the Switch() methods. You can
retrieve parameters, if any, with the Parameters() method.
Before you can compile Dependency Finder, you need to set the following environment variables:
CATALINA_HOME to your Tomcat installationThis target will create everything you need to run Dependency Finder in-place.
ant exec
If you make a change, and you simply want to refresh the executable, simply run:
and jar
This target will create both Javadocs and the various manuals.
ant docs
This target will create a set of distribution files from a clean build.
ant
Before you can compile and run the tests, you need to set the following environment variables in addition to those for compiling Dependency Finder:
JUNIT_HOME to your JUnit installationJMOCK_HOME to your jMock installationFITLIBRARY_HOME to your FitLibrary installationHTTPUNIT_HOME to your HttpUnit installation
You will also need to put junit.jar on Ant's CLASSPATH. For this, you can
either set the CLASSPATH environment variable, or with Ant 1.6 and above, you
can copy junit.jar to ${user.home}/.ant/lib, where ${user.home} is the
home directory for the current user. This depends on your operating system.
On Unix, it is $HOME and is typically /home/username. On Windows, it is
typically C:\Documents and Settings\username.
I recommend you use JUnit 4.4 or later, where the JAR file is named
junit-X.Y.jar, but everything should work as is with any version of JUnit 3.8
and above (where the JAR file was named junit.jar), and even some older ones.
To run all tests and generate test reports in the reports directory:
antor, to run tests manually:
./gradlew lib:check integration-tests:check fit-tests:check
These instructions make sure you are working from a clean copy of the master
branch of the repository that has been tagged appropriately.
git tag -m "Tagging the 1.4.1 release of Dependency Finder" 1.4.1git push --tags (a workflow on GitHub will create the release there)ant -Drelease=1.4.1 docscp docs/{Manual,Tools,Developer}.html ../websitecp -R docs/images/* ../website/imagesgh release download --pattern '*' --dir /tmp (copies the release files to /tmp)DependencyFinder-1.4.1.zip the default download for Windows.DependencyFinder-1.4.1.tar.gz the default download for all others.You can compute code coverage metrics using JaCoCo.
To run the tests and generate code coverage reports:
./gradlew testCodeCoverageReport
To view the results, open
code-coverage-report/build/reports/jacoco/testCodeCoverageReport/testCodeCoverageReport.xml.
To publish the results:
ssh ${USER},depfind@shell.sourceforge.net createssh ${USER},depfind@shell.sourceforge.net rm -fR /home/groups/d/de/depfind/htdocs/jacocoscp -r code-coverage-report/build/reports/jacoco/testCodeCoverageReport ${USER},depfind@shell.sourceforge.net:/home/groups/d/de/depfind/jacocossh ${USER},depfind@shell.sourceforge.net shutdownOr use an archive:
code-coverage-report/build/reports/jacoco/testCodeCoverageReport directoryscp to transfer the archive to SourceForgessh to login to SourceForge